Shadow-y-Of-Chornobyl-y looking CoreVariables and how to edit them
The time flows as usual, the scope of your pick up abilities is back to huge-ish, and no dietetic headshot sound is ever present in my ears. Ah… what a blessing!
Inspired by Even Longer Days and Axxii’s Headshot sound fix.
This mod combines changes from the two aforementioned mods making them compatible, and also changes the looks of gameplay ever so slightly.
The only file being changed is CoreVariables.cfg located at Stalker2/Content/GameLite/GameData/CoreVariables.cfg
Below the Change list is the Tutorial in case you want to tweak these variables more to your liking.
THE CHANGES
1. The author of the original edit is JCaleb who made Even Longer Days
The length of the day is changed from 1 hour irl-time to 2.4 hours,
bringing it in line with the games from the Original Trilogy
RealToGameTimeCoef = 24
– – – changed to – – –
RealToGameTimeCoef = 10
2. The author of the original edit is Axxii59 who made Axxii’s Headshot sound fix
Removed the pathing for the Critical Damage Shot sound cue
aka the Headshot sound
CriticalShotDamageSound =
/Script/AkAudio.AkAudioEvent’/Game/_STALKER2/Audio/WwiseAudio/Events/Getting_Damage/SFX_GettingDamage_Critical_Shot.SFX_GettingDamage_Critical_Shot’
– – – changed to – – –
CriticalShotDamageSound =
3. Increased the angle at which you can look down from 80° to 90°
so you can see not just the tips of your feet, but also your body
(squatting looks real cute)
ViewPitchDownLimit = -80.0
– – – changed to – – –
ViewPitchDownLimit = -90.0
4. Brought the FOV when in a dialogue to match the default player’s FOV
(note that if you’ve changed the FOV in the game settings to be higher
than 90° then it will still zoom in when starting a dialogue since it’s set
to 90° and will not match your FOV if you’ve set it otherwise.
The fix for that is down in the tutorial.)
DialogFOVDefault = 70.0
– – – changed to – – –
DialogFOVDefault = 90.0
5. Increased the angles at which you can turn the head while
climbing the ladder, so you can look around just like in real life
(95° left and right and 90° up and down)
ClimbViewYawLimit = 30.0
ClimbViewPitchLimit = 40.0
– – – changed to – – –
ClimbViewYawLimit = 95.0
ClimbViewPitchLimit = 90.0
6. Enlarged the area for the Interactive pop-up to appear around objects
No longer do you need to meticulously look directly at every item
on the ground to pick it up, allowing you to Spam F the shit out of your keyboard.
It also for bad or for worse affects Radios, Lamps, Chests, Stashes,
prompts to talk to NPCs and every other instance where you’d want
to press ‘F’ to interact with something
NarrowTraceInteractionRadius = 2.0
WideTraceInteractionRadius = 5.0
– – – changed to – – –
NarrowTraceInteractionRadius = 25.0
WideTraceInteractionRadius = 25.0
Spamming F almost* just like in the Original Trilogy.
* you can make the values higher than 25 if you want
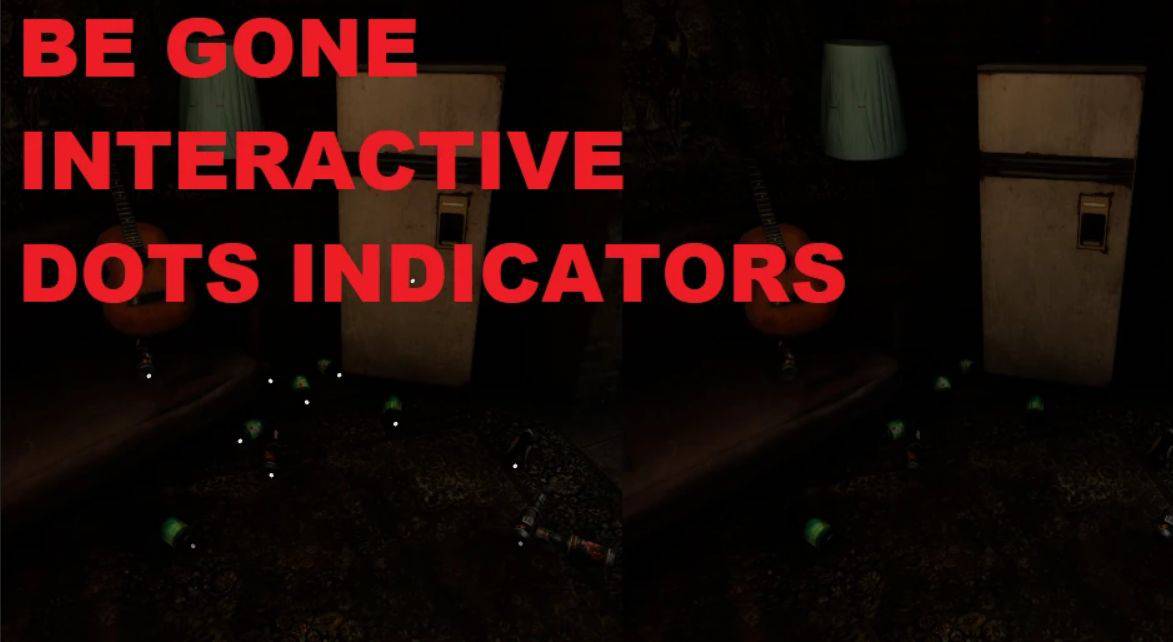
7. Set the max limit for visible Interactive dots to zero
These annoying little white things that appear on all the interactibles
from the moment you enter a room from all across the said room
are now turned off.
These are set by default to 40 but I propose either 0 or 1. You decide.
MaxNumberOfVisibleInteractionDots = 40
– – – changed to – – –
MaxNumberOfVisibleInteractionDots = 0
And that concludes my small change list. If you are here for the tutorial or just curious, you’re welcome to come down with me.
THETUTORIAL
If you’ve opened the .pak file from this mod yourself you might wonder why is
the MaxNumberOfVisibleInteractionDots is set to 000 instead of just one 0 as stated
in the changes above.
As well as all the other mentioned variables having some extra zeros at the start.
The reason is – to give you more room to edit it.
For you see there’s 2 ways to do that, that I know of.
One is really stupid and works for my mod only
The other is complicated and somewhat universal
One requires a text editor and an ability to keep track of how many characters you’ve added and erased
The other requires downloading a 3rd party tool and learning how to use it (Spoiler: It’s not the Unreal Engine)
I will shortly tell you about the first one first, and then give links and an even shorter explanation of the second one.
THE TUTORIAL PART ONE
The .pak file that I give here is unencrypted. Which means to edit it you need to open it in a text editor (Notepad++ will work fine,
don’t use Notepad, it’ll mess up the encoding) and change values in it without needing to unpack and then repack it back up.
The only catch is – the length of the file must stay the same.
So if you change 90 to say 120 you add one extra character, and that means that somewhere in the config file one character must be removed.
The game will crash on start if this is not followed. If it happens – It’s fine, just undo the changes, no big deal.
The dumbest way (we’ll take for example the DialogFOVDefault parameter,
and in that situation we want it to be 120) is to do it like this:
DialogFOVDefault = 90.0 ==> DialogFOVDefault =120.0
↑
//the space between = and 1 is removed
But in our not-so-dumb case with the extra zeros it’s going to be like this:
DialogFOVDefault = 090.0 ==> DialogFOVDefault = 120.0
(for those of us who remember the Insert Key existence it’s time to shine)
The rest follows suit. If you want a 100 to be a 1000 you make it 999 and it takes you no extra space;
to turn 260.0 into 2.6 you make it 002.6. You get the idea.
Just don’t write comments. All characters count.
This file I’ve modded (CoreVariables.cfg) contains parameters for stamina use/regen, health, bleeding, movement speed, carry weight, artеfact spawn chance, weapon durability, time of sunset and sunrise and some others – around 50 useful parameters in that config – and mods that change this stuff will likely conflict with each other.
If you want to edit just this Very Important File this is all you need – unencrypted mod and Notepad++
Or to see the unpacked original .cfg you can download the other archive in the files of this mod.
THE TUTORIAL PART TWO
To unpack and repack most of the S.T.A.L.K.E.R. 2 mods you can use Unrealpak.
I advise you to read the README on the github page.
Download the files in an archive, unarchive them into a folder of your choice, and you’re ready to unpack the mods.
To do so you take your .pak mod you want to see naked and drag-n-drop it onto the UnrealUnpak.bat
Most of the time console will tell you the job is done and you’ll see the folder with the mod name appear in your Unrealpak folder.
From here you can look at the modded file and edit it however you like.
*1 hour later*
Now you’ve done poking around and want to see it in-game.
Here we need to take a few steps back.
In the Files section of my mod there’s a second archive to download.
It contains the original CoreVariables.cfg with the folder structure it must be packed in.
You can create the folders yourself or download an archive.
the path for CoreVariables.cfg must be Stalker2/Content/GameLite/GameData/CoreVariables.cfg
Where “My Extremely Cool Mod I Made” is a placeholder for your mod’s name.
That was the hard part.
Now drag Your Mod Folder onto the UnrealPak-With-Compression.bat or UnrealPak-Without-Compression.bat
and watch the .pak appear in your folder.
Take your mod to the ~mods folder inside the S.T.A.L.K.E.R. 2 game folder
(the full path is YOUR_DRIVE_LETTER:\Steam\steamapps\common\S.T.A.L.K.E.R. 2 Heart of Chornobyl\Stalker2\Content\Paks\~mods )
and now your mod should be a part of the game.
If you try to pack your mod without the proper folder structure it will not work.
Important note made the person from GitHub:
UnrealPak.exe ignores the base path for a PAK file during extraction, so chances are high you won’t get the full path this way. It’s
recommended you use another tool for PAK unpacking.
Meaning that if you use it to unpack your own mod it will not give you the full folder structure back.
BUT there’s a way to still see it. And see it for every S.T.A.L.K.E.R. 2 mod.
And the text editor comes to the rescue again.
At the end of every .pak file of every mod the folder structure for the files is specified.
So if you don’t have it, view .pak in a text editor and copy the path from there, removing all the NUL spaces between slashes.
OR use another tool for unpacking as The Person from GitHub advised. And tell me if you find one!
Downloading this you understand that:
This mod does not change stamina use/regen, health, movement speed, carry weight, artеfact spawn chance, weapon durability, time of sunset and sunrise and some others – around 1000 parameters in that config – and will likely conflict with the ones that do.
(Source: I’ve made it the f–k up and I’m talking out of my ass because I’ve not tested any of these possible conflictions.)


